Showing posts with label Crepe Tape. Show all posts

Monday, January 9, 2017

Hello Beautiful by Giovana Smith

Hello everyone! Hope you all have a great Christmas/Holiday season, I relaxed and didn't do as much as I wanted, but it OK, sometimes you need to slow down.
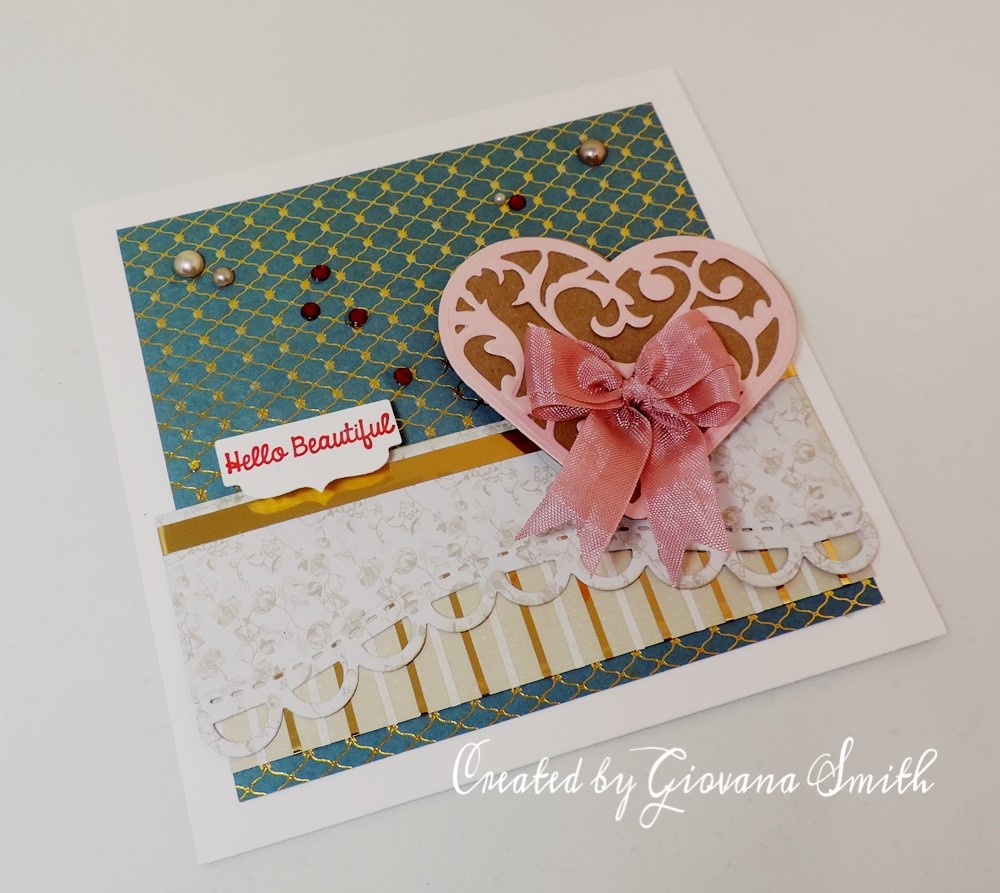
So today, I have an elegant card for you, the steps are very simple and easy. " This card is a 6" x 6" square.

Step 1: Gather all your materials together, I ended up using 1/4" gold metallic and 1/8" white.

Step 2: Cut a piece of patterned  paper, this one is 2" x 5.25", then apply the 1/8" Gold Metallic Tape every 1/4" (as seen in picture)

Step 3: Now add the 1/8" White Crepe Tape in between gold tapes.

Step 4: Add piece to  5.25" x 5.25" patterned paper.

Step 5: Add a piece of 1/4" Gold Metallic Tape to die-cut border panel.

Step 6: Add sentiment a heart, Add embellishments.

Here is the final look. Love the color combo and the gold and white tape really add an extra elegant touch.

Hope you like it!
Have a fantastic day!!


Monday, January 2, 2017

DRESSING UP JANUARY!

Happy New Year! 
Karen here with a calendar panel thats easy! 


I used some cute left over scraps and made the bg. 
Instead of making strips of paper for the layers I've used Rainbow Tape! The Metallic Purple 1/8" and Silver 1/32" gives it just a little shimmer! I love how easy the White Crepe Tape is to color with Copics. This is a great way to insure that your elements match perfect with your colored images. 


Speaking of images...How adorable are these from IO!
Here is a closer look at the Rainbow Tape. 


 Thanks for Looking!
To see more details and product used you can go to my blog


Monday, December 26, 2016

Define the edges with Rainbow Tape!


Jenny here today!
 I thought I'd share an easy butterfly card with you.
Black, White and Bold color always make a good combo for any card.
Rainbow Tape extras give it a little extra oomph!


I used Copics to color the image. And then I framed it with rectangle die cuts. I added Rainbow Tape to the frames.. black and white. It gives it just a little bit of extra POP and defines the edge! I used the 1/16" widths for both cards.


You can find more info of this project HERE on my blog!


Monday, October 31, 2016

TRICK OR TREAT!

TRICK OR TREAT!

Happy Halloween! Karen here with a shaker card to share with you today.
Love those thin lines you can get with  Rainbow Tape!
I have used the 1/32" in black for the tiny edge around the lavender paper.
A single line of tape was also used along the bottom of the white layer to anchor her.


To see more details about the card you can visit my blog here!

Thanks for looking!

Tuesday, October 4, 2016

Art Canvas by Giovana Smith

Hello friends! How are you all doing today? Hope it is a good day! Today I am participating in a collaboration blog hop, I made this canvas (and I love how it turned out).

I used 3 different colors to my canvas, I was very impressed how the tape stayed in place, the canvas got sprayed, painted over the tape and the tapes never peeled off!!

I added on top and bottom right corners 1/4" Blue and White Masking Tape, I also added 1/8" Gold Metallic Tape 


You can find more details on my blog HERE

Hope you like it!
Have a fantastic day!


Wednesday, September 28, 2016

Birdie Birthday!

Jenny here today!


 The Black Rainbow Tape just stays out on my desk, 
because its such an easy add on to almost any card!

Today I've used it on the inside panel of my card with the clouds. I just added a strip of 1/8" Black Tape. I die cut the white frame, added my clouds to the inside panel and then the black edge and then put it back in place. Much easier than measuring and adding an additional layer of card stock!


Tuesday, September 27, 2016

So very thankful by Giovana Smith


Hello friends!! Giovana here today with a very Fall-y card. Fall is my favorite season, love seeing all the leaves changing colors, fresh weather (in the PNW) and a lot of pumpkin everything {wink, wink}

So today I have a very simple card with Fall colors using this new set from Concord & 9th.
The background was created with Color Burst, then I added 1/16" Purple Masking Tape and 1/16" Gold Metallic Tape. I also added a strip of 1/16" Gold Metallic Tape to the brown leaf.


Hope you like it!
Have a fantastic day!


Thursday, September 15, 2016

Ghoulish Greetings by Jeanne Streiff

Hi! Jeanne here today with a Halloween card with a fun border made with Rainbow Tapes.


I started by stamping Ghoulish Greetings in orange with my Mini MISTI . I added a few speckles of red ink in to give it a little texture.

Next I did some simple watercoloring over the image. created a washy background in purple and pink and then added a few splatters.

I stamped my sentiment with Mini MISTI (My Sweet Petunia). I added 1/8" Black Rainbow Tape and 1/16" Purple Rainbow Tape along the left side  and then added a line of purple tape to highlight my sentiment. Such an easy way to make a sentiment pop!

Supplies:
1/8" Black Rainbow Tape and 1/16" Purple Rainbow Tape
Impression Obsession E7841 Crow on Pumpkin, C19252 Ghoulish Greetings 
Mini MISTI from My Sweet Petunia
Watercolor paper
watercolors
orange and black ink


Have a great day!

Tuesday, September 13, 2016

Beautiful Butterflies from Giovana Smith

Hello friends! Giovana here today with an easy idea for your card projects. For this project I used the 1/4" Red Crepe paper tape, I adhered it to a piece of Ivory Cardstock and added under the stamped panel (both sides)


This tape has a really nice texture, perfect for your card paper projects.


Hope you like it!
Have a fantastic day!


Wednesday, September 7, 2016

You are beautiful

Hello friends! Giovana here today bringing you a super easy technique to create a super cool background. 
For this technique I used 1/8" black crepe tape and 1/16" gold metallic tape. 

Here I used a piece of white cardstock, size 3.75" x 5", I started adhering the 1/8" black crepe tape and then 1/16" gold metallic tape, then I left about .5" space and repeated the process.


I stamped a sentiment , added a die-cut word and flowers from Concord & 9th  and the card was done!! 

Here you can see the tape colors showing much better.

Hope you like it.
Have a fantastic day!!